My favourite blogs

Friday 23 December 2016

Christmas is close!

This is my 50th blog post since I began just over a year ago.  I decided to start blogging during the summer of 2015 but it took a while to get going. Whilst it can be a fair bit of work each week, I've had some lovely feedback from friends and strangers. 

With Christmas close, I thought I'd share a decoration I've made with a few friends  recently.   So, delve into your Christmas stash and pull out two contrasting Christmas fabrics.  Use a saucer or something similar and cut out two circles of fabric. Place right sides together. 


Next, stitch around the outside with a narrow seam, remembering to secure the start and end. Leave a gap to bring the fabric right side out. 


With the fabric right side out, press and manipulate the gap with your fingers/iron to make sure it's  flat and 'round looking'. Top stitch around the piece close to the edge. There is no need to hand stitch this to close up the gap. Trim off all loose threads.

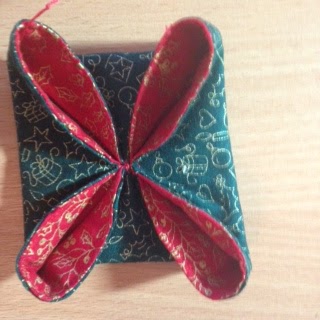
Using a needle and thread pull together the north, south, east and west points like this


Then, place the fabric onto a flat surface and press it flat.....


Once flat, bring over the outside part of the 'petal' so that it lies flat, a bit like turning over a collar.  Press it flat with your hand. To finish, add a loop to hang it on your tree and either stitch a pretty button the centre (this neatly covers your stitching) or, like me, get out a glue gun and add a 'card topper'. I bought mine from Hobby Craft. 

So here are some of the results:


The above decorations were  made by a group of ladies who meet
 each week at Cherry Hinton library and the ones below made by Lottie (aged 12)  and Joanna, her mum. 


As I await my guests, all the food is bought and presents are wrapped. I hope all is well with you. 

Happy Christmas 


Sunday 11 December 2016

Seeing stars

My end of term lesson at Coleridge School ended with a reminder of how to make half square triangles (HSTs)-the basis of so many patchwork designs. 

We made quite a pile using two methods concentrating on using a special paper template to stitch on called 'Triangles on  a roll' from Quilt direct in Devon. You lay up two large pieces of fabric, one light another dark. You then stitch on all the dotted lines, cut and press. Lots of HSTs in quick time. 

We also made some HSTs by the usual method of placing two pieces of fabric together, marking a line down the centre and stitching down each side of the line. I found the triangles on a roll method was by far the more accurate with virtually no trimming needed. 

So, planning ahead, I have been making samples ready for the new term. The first week back will be 'stars'. Thinking about a finished block 8" square I made this small block which uses flying geese units made with the 'goose' bit being white instead of the 'usual' darker fabric.  Could look stunning in bright colours or white stars on a bright background. 


Then I thought "what can we do with all those HSTs we made the other week?"


This next star block is much bigger than I usually make. It's 16" using Shibori fabric from Backstitch at  Burwash manor.  I love this fabric! It is much brighter in real life and you can see I took a bit of care to 'fussy cut' the centre block to show off the lovely tie dyed circle.  There will be more! 


Then another star came to mind...


This is  the 'triangle in a square' unit.  I had the template lying gathering  dust so decided to use it.  The unit is quite easy to make and you always make it slightly oversized and trim down. I think this is called the 'Friendship Star'.   

This one is before I stitched it together. 


Here, I've put it all together with a light star on a dark background. I'm not convinced I really like this block which finishes at 12" square. I feel sure alternating  light and dark stars would look very good indeed. 


I got quite enthusiastic about making stars and did a bit of research.  I found this one from the Missouri Star Quilt Company  (MSQC) on U Tube. It 's called the 'disappearing hour glass' block.   The website suggests using two 10" squares but I decided to go a bit bigger and put together  two fabrics, one white, one dark grey, 14" square. 


Step one: place both fabrics RS together and stitch a 1/4" seam around the four edges. Then cut across all four corners. 


Step two: press all seams to the dark side and arrange in a 'hour glass' formation.


Step three: stitch the four units together taking care to match the seams. I then pressed all these seams open and very flat.


Step four: measure the block. Mine came out at 18" square and you then cut the block up into thirds. The maths proved easy with 6" sections.  Don't let it move around too much.

Step five: the centre unit is turned once to the right.

Step six: turn all corner units two turns to the right.

Step seven: the 'middle' units are all flipped over


 Step eight: assemble all nine units, again pressing all seams open and flat.  

This is known as a 'counter change' design. It's a big block with many possibilities. 

Phew...any more variations? I found one more to try. Again inspired by the MSQC I found this block called 'Sweet Stars'.  


Step one: cut 1 light patch 4" square, two 2.5 " light squares, one dark strip 2.5 " by 6" and another dark strip  2.5 " by 4".

Step two:  take the shorter dark strip  and place the small light square on the top, draw a line from top left to bottom right. Stitch and flip over, press and  trim the seam.

Step three: repeat wth the longer but this time  mark from top right to bottom left. Stitch, flip, press and trim the seam. 


This photos shows the wrong sides once the trimming is done.


Step four: lay out the pieces like this and stitch the short strip to the four inch light patch. 


Step five: stitch on the longer strip and it's done. 


Repeat to make four units and stitch together. 


I'm off now to buy more of that Shibori fabric...the creative bug has really kicked in. 


Sunday 4 December 2016

New adult patchwork class make fabulous progress....

It all started about a month ago whilst sitting at home and checking my email. Coleridge School were looking for a tutor for an adult class every Monday afternoon. The tutor employed to teach this class had dropped out. 

It had been a long held ambition to teach grown ups. Don't get me wrong, I loved teaching children but adults would be a welcome change. I was interested in this class for three reasons: it was on a Monday afternoon, it was 2 minutes walk from my house and it was a beginner's class. Three ticks. 

What followed was a frantic session of form filling of various bits of paperwork. So with 5 days notice I arrived at the school to meet seven delightful ladies full of expectations. The Janome machines were a challenge as I'm a Bernina fan and there were no 1/4" seam presser feet to be seen. Oh, and no bobbins.  

Never mind, I'm used to thinking on my feet and I got the ladies to make a piece of crazy patchwork. 


And the end result by one lady.  However, this quilt evolved using only fabric from my scrap bag. Here's the result..what an eye for colour!!


We also tried a four patch and half square and quarter square triangles. 


Not bad for a pile of scraps!  Looks easy but in practice it is all too easy to forget to completely cover up the previous row and lose all sense of direction. On another day we quilted the pieces and turned them into zipped pencil cases.

Without the proper patchwork feet I decided to take a bit of a risk and teach the class how to do foundation piecing.  Quite mad really as it's not the easiest of techniques to put over but at least you can sew on a line.

I made two samples.....destined to be 'mug rugs'!


This one, above, in an unfinished state and this next one below


where I added quilting and a binding.  Did I mention I was being observed this lesson? A tad nerve racking.........

So, some of the results although not totally finished......


As the weeks progressed we tackled making flying geese. Everone made a set of eight geese and found different ways of putting them all together. 


Last week we made  the 'disappearing nine patch' as shown below.  This is a great block because you get a 'wow' factor for not that much effort.  Accuracy in cutting and piecing is coming along nicely...


Finally, I can't resist adding this last photo. My four year old grandson was in Cambridge last weekend.  I had ready some wooden templates of trees and stars bought at a craft fair. We had a fun afternoon with a glue gun and my button collection. It's great to be a granny....


Sunday 27 November 2016

Deborah OHare inspires Cambridge Quilters Members


Just over a week ago, Cambridge Quilters, meeting at Granchester Village Hall, had the pleasure of meeting Deborah OHare from Quilt Routes.  Deborah came to us from Wales to do a talk and workshop.  


Deborah told us how she was a teacher and whilst working abroad took up patchwork and quilting. On returning to the UK she looked for some classes to continue with her new passion and decided to undertake the City & Guilds course in Patchwork & Quilting followed by Machine Embroidery. 

Deborah found her speciality in fabric painting and she showed us a series of pieces based on the many, many places she has travellled to throughout her life.   As an artist she has experimented with many different ways of putting an image or design onto cloth. 

 Nothing too complicated...simple methods which can be done in anyone's kitchen. I was reminded of several, such as transfer printing, which lie forgotten in a studio cupboard.  


This is a photo from Deborah's blog showing her students, on a retreat, painting fabric. 


These two pieces are fairly typical of her recent landcapes. The photos don't do justice to the detail and machine embroidery Deborah includes. 


I did buy the kit to make this set of landscapes.....
wish I'd signed up the the workshop! 


We were not shown these pieces which I found on Deborah's blog. As a 'Modern Quilter, I find these pieces very inspiring.  For one thing, they are quite 'traditional' blocks yet the use of colour is quite stunning and is combined with very intensive straight line quilting

 Here are a couple of close ups. 


Finally, here are a collection of photos taken of members' work at Deborah's workshop...very impressive indeed. 


For more information about Cambridge Quilters do go to our website click here
We welcome anyone to come to a meeting as a visitor paying a small fee. You do not have to be an expert to join, we are a friendly bunch! 


Sunday 20 November 2016

Mary McIntosh visits Cambridge Quilters

We've been really spoilt at Cambridge Quilters with two very engaging speakers.  On the Wednesday evening meeting recently we had Mary Mcintosh speak about her journey into patchwork and quilting. 


Mary related how she began patchwork and quilting back in 1995 when she lived in Canada.  By 2007 she decided to undertake the City & Guilds Course with Annette Morgan which she completed four years later. 

Mary showed us many, many pieces of her work. Early design inspiration came from the site of some traditional brickworks near her home on the Suffolk/Essex border.  3D vessels emerged along with panels overlaid with many fabrics and even newspaper. Here's a close up of one....


More recently Mary has taken an interest in discharge dyeing.  Working on a whole cloth, Mary uses discharge paste to print through a silk screen.
Because bleach is involved, the dye in the fabric is removed leaving lovely copper coloured designs behind. 


Mary is a regular tutor in the area and beyond. She exhibits with 'Out of the Fold' based in Bury St Edmunds and 'Tin Hut Textiles'. 

Click in the link to read more about Mary  on her  blog


Sunday 13 November 2016

Duxford Autumn Quilt Festival

With so much going on I clean forgot to mention going to the Duxford Quilt Show recently. A few friends commented that they felt the show was smaller than usual but it seemed much the same to me.  I still wish Creative Grids had a stand as I always went to them for new 'must have' equipment. 


As always there were several feature displays. 'Inspired by Hockney' by the LINQS group from Lincolnshire caught my eye.  They used the work of David Hockney as their inspiration; his work, titles, subject matter, colours, etc.   This quilt based on Hockey's trees really spoke to me. Made by Karen Lane this piece is called 'Three Tall Trees' and was based on a photograph taken in Woodhall woods. Lots of stitching with appliqué, fabric painting and both hand and machine work.  I could only photograph a small part of this quilt. 

Their website here is worth a visit with more about their inspiration....


I was also drawn to the work of Val Thomas who is a member of South West Quilters. For the last 15 years or so, Val has been interested in depicting 
fantasy in her quilts . She dyes her own fabric  and I really admired the intense free machine quilting done with invisible thread. 

 I only photgraphed two of Val's quilts which were based on fantasy castles. Procian dyes in a coffee jar combined with permanent markers


I was also quite taken with the retrospective exhibition of Christine Porter's work. Sadly one of my favourite quilts had a 'Do Not Photograph' sign so I shall just have to try to describe it.  

One large square quilt entiled 'Birds of Paradise' had a design of eight stylised  peacocks arranged in a circle. They were very colourful and achieved with  the technique of  raw edge appliqué. Not easy with such large motifs.  The entire quilt was quilted in straight lines of different colours edge to edge but in every direction possible. I plan to try this out sometime! 

I've recently started teaching again and must blog about this sometime. I'm teaching a lovely 12 year old girl who is able to come to my studio on a week day as she is being 'home schooled'. We've really had some fun exploring how to use a sewing machine to make notbook covers, pencil cases and bags. 

Somehow, I've also ended up teaching fab group of ladies at Coleridge School on Radegund Road, Cambridge.  This is a brand new class for beginners. The original teacher had to bow out and I was thrown into the 'deep end' at very short notice. More of this another time but I've really enjoyed going back to 'basics' with them. Been busy making log cabin and courthouse steps samples not to mention dozens of 'flying geese'. 


Finally, I attended the auction for the new Arthur Rank Hospice appeal. All Cambridge Open Studios participants were asked to create a heart. I've blogged about making mine before now. Happy to report it sold and went to a good home. Oddly enough, I met the new owner at a Sale Day for Cambridge Quilters and she told me how much she loved it. A happy end to the project with COS artists raising close to £9000 for the appeal.